

Mother’s Day 2017

Just like last year I wanted to do something crafty and meaningful for Mother’s Day and managed to find some fantastic ideas on Pinterest (of course) that I figured would be easy, fun, useful AND meaningful! Perfect! Well…you’ve all heard the Pinterest fail stories right? This craft story has a happy ending, but a pretty rocky beginning!
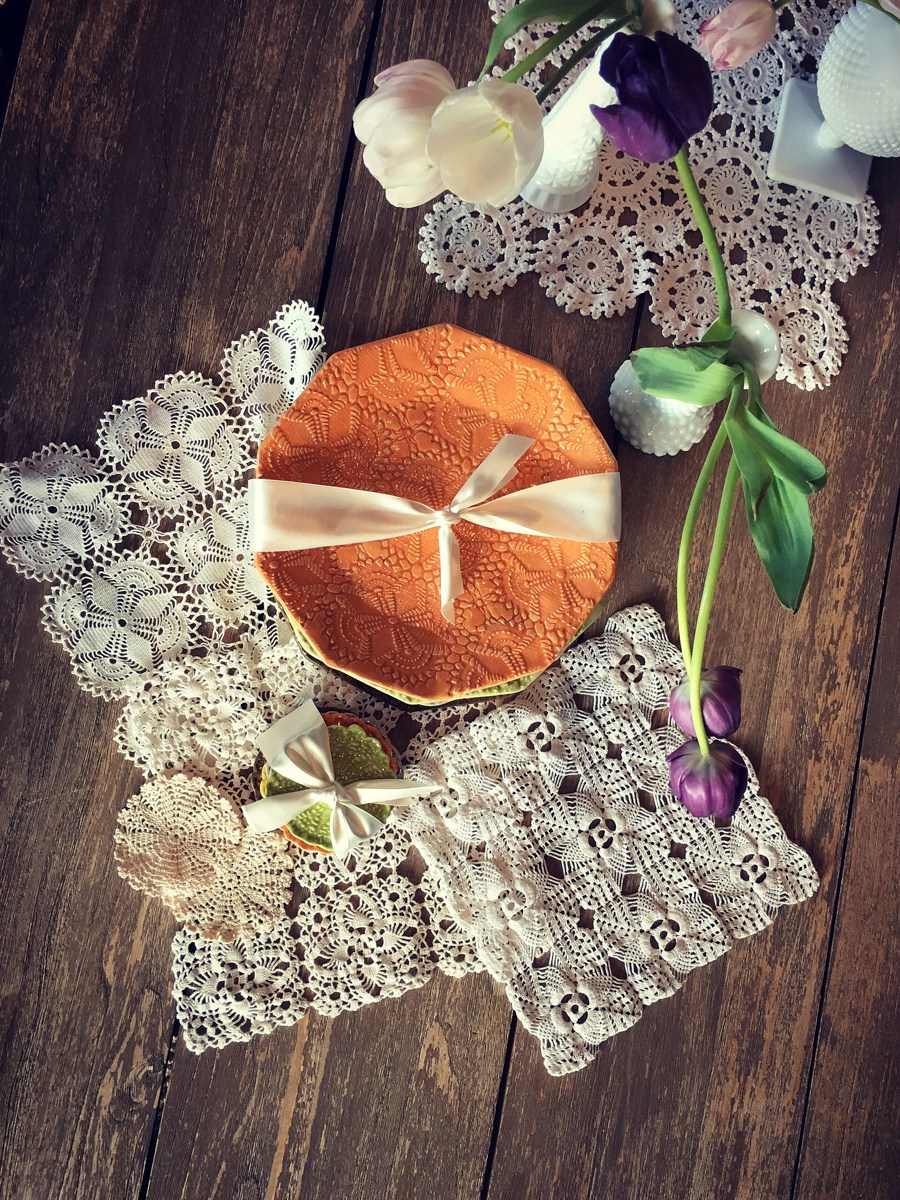
I’m not sure how I came to the idea of DIY dinner plates, but that’s where this story begins. I found some beautiful inspiration on Pinterest for lace imprinted clay plates with basic instructions that sounded totally doable. I loved the idea of using lace as the pattern because I have some beautiful crocheted doilies my mother’s Aunts made and gifted to her. I also have lovely little hand crocheted doilies from my grandmother that I figured would make beautiful clay coasters. Last year I was able to incorporate china teacups, my grandmother left me, into my mother’s gift and I loved being able to bring the spirit of my mother’s mother into the day that celebrates them. Using my great Aunts and Grandmother’s crocheted doilies was another really cool way of keeping their spirits alive on this special day. Once I decided on the plates I built the rest of the gift around the idea of a hostess basket which would include embroidered dinner napkins with napkin holders, the plates and the coasters. The first thing I did was order simple linen napkins and vintage porcelain napkin rings from Etsy. I wanted to save myself some time and energy and figured I’d buy the napkins instead of sewing them and then personalize them with an embroidery and monogram of my choice. That was actually the only smart thing I did. I ruined how brilliant that idea was by waiting until the day of to do the embroidery. I have a very fancy, very complicated Bernina 580 sewing machine and have never had the opportunity to take any lessons on it. So I am constantly trying to figure it out by watching YouTube videos and reading articles online. This is a very slow going way of figuring out my machine and definitely not a smart thing to do the day the gift is being given! I naively thought to myself that all I had to do was simply program the embroidery stitch I wanted to use, press a few buttons, put my fabric in the hoop and voila! Custom embroidered dinner napkins! Yeah, not so much! Anyone who sews knows that it’s far more complicated than that. You’re upper thread tension needs to be correct; your bobbin needs to be inserted properly; your machine needs to be clean and dust free; your needle and thread needs to be specifically for embroidery; you need to know how to program the damn thing to do the embroidery you want; position your fabric properly in the hoop so the design ends up where you want it, and so on and so on. I managed to get it done but by the time I finished I was so burnt out and frustrated that I had to go to my room and do some deep breathing just so I could let it go. Not exactly the best way to spend my Mother’s Day. I will eventually attempt this again but will give myself far more time in the future to get it right.


The diner plates were also far more complicated and time consuming than I originally anticipated. Thank goodness I gave myself at least a week to accomplish them, but truth be told, I should have given myself a month or more to get the hang of it. Pottery is no simple task and as I have now discovered not really my thing. Sometimes us crafters have to make decisions in life about how many different hobbies we embark on. Pottery, for me at least, is not going to become one of my crafting priorities. I may choose to dabble in it here and there, but it really requires serious craft and skill both of which take time and experience. Being the sometimes idiot that I am, I waltzed right into my local art center, signed up for a month membership so that I could use their equipment and kiln; purchased some clay and got straight to plate making like it was no big thing. However, clay I now know, is very very touchy! It has a memory, you see, which means that if you lift it up from the rolled out edges or pick it up from out of the mold wrong it will retain that shape when you fire it. Which makes for some slightly off kilter, kinda wobbly dinner plates. Once you’ve managed, with the greatest care, to imprint your lace; slide it onto a mold; cut off the excess around the edge of your mold; sponge off any hard edges that will turn to razor like glass once fired; and, put it on a rack to dry you must cover it properly with plastic to ensure that it drys slowly and evenly. One of my plates dried too fast on one corner and cracked. I tried valiantly to repair the crack but once fired it worsened and that plate is now a throw away. Those around me at the art center who work with clay all day long just shrugged their shoulders and chuckled at the absolute devastation I felt for all that wasted time and energy. They informed me that a cracked plate or two is status quo in the pottery world and to be expected. I tried, like them, to shrug it off, but I couldn’t deny how bummed I was that I’d have to start all over with another plate. I ended up including the cracked plate in my mother’s gift so I would still have a set of 6 to gift her with the promise that I would eventually go back to the art center to make her another. She’s trying to get me to make her a set of 10; but, the thought of all that time with touchy clay exhausts me! I also failed to understand that the colorful glazes I used to give my plates a bright fun spring vibe don’t necessarily turn out the way they look when you paint it on the clay before it’s fired. One plate that I thought was going to be a lovely fern green ended up a rather ugly poop color. So really, I owe my mother at least two more plates since the poop brown one is kinda throwing off the whole spring color theme.


The plates went through an initial under glazing (where I thought I had picked the perfect spring colors) before the clear glaze that turns it into a shiny glassy surface after it’s been fired. It takes days between each glazing for the plates to be dry enough to go in the kiln. They weren’t done until the Sunday of Mother’s Day and my amazing husband drove the 20 minutes into Park City to pick them up from the art center while I toiled away on the napkins. My mother and I also had the bright idea to cook our own Mother’s Day dinner so as soon as the napkins were finished I rushed to the kitchen to start making the vegetable sides I had chosen for our meal. Yeah, it was a pretty hectic day that was totally self induced but I learned a very valuable lesson…next year I’m picking my projects at least a month in advance; making sure they’re actually doable for me, getting them done with plenty of time to spare; and, making absolutely certain neither my mother or I lift a damn finger on that sacred day that celebrates us for lifting all our fingers every other day!


32 Comments
They are beautiful! Everything turned out awesome! You don’t give yourself enough credit. And I am sure your mom loved it! Would love to have the machine that you used for the embroidery. That would be cool to have! Congrats!!
May 20, 2017 at 7:01 pmYou are the the best Katherine! Those Plates are amazing!! I took ceramics & pottery classes for over 10 years & even tought. Even my teacher had color & cracking problems who did this for decades lol.But I know the frustrations when pieces don’t kiln fire right. Love your lace pattern. Awesome napkins too. Love homemade gifts I’m sure your Mom was over the moon. Thanks for sharing!!!
May 20, 2017 at 8:22 pmLoved this! I didn’t know you had a blog and stumbled upon it through Instagram. After reading some of your posts I find we are a lot alike. I’ve had craft projects that have popped into my head and I jump into action. Only to find out its a bigger project than I anticipated lol but I rarely give up. I love this project and how it turned out! Thanks for sharing! It’s good to know I’m not alone in my antics and frustrations with my projects
May 21, 2017 at 12:00 amWere the doilies ruined after this? I have some doilies my grandma made, but I don’t want to get them dirty. Everything you did looks beautiful. I love the duck rings!
May 21, 2017 at 12:38 amYou did a great job. Pottery is something I have always wanted to try but am afraid of. I recently watched two seasons of The Great British Throw down (you should watch them) which cemented in my mind it is a really challenging art & makes you understand the cost often associated with pottery.
May 21, 2017 at 12:40 amI still think you should have a shop in Park City. I thought clothes, but maybe you’ll get better at crafts and can have some of them, too. I wouldn’t mind having a half- botched clay plate from you. It would be kind of charming not to be so perfect.
May 21, 2017 at 8:51 amAmazing, just absolutely amazing!
May 21, 2017 at 12:00 pmSo, I stumbled upon this and after reading your woes and seeing the visuals you included, I had an idea spark in my also sometimes idiot brain. First off, before you start rolling your design, take a really long blade and slide it under your clay to loosen it from the table. Then after you cut it to almost-shape slide it under again and slip one of those flexible cutting boards under it to lift it to the plate mold. It might work to save some hassle. 🙂 Just a random thought.
May 21, 2017 at 12:06 pmI absolutely love reading your blog and emails – I get at least 20 emails a day but when I see yours come in I stop boil the kettle pour myself a cup of tea and get ready to laugh and / or cry depending on your story. Your writing takes me to your warm home in Utah and I can relate to all your antics having had my little boy 3 years ago now. Keep Sharing Katherine
May 21, 2017 at 1:22 pmIt is all so pretty! I have an embroidery machine that I still need to learn!
May 21, 2017 at 1:26 pmYou’ll laugh, but I’m actually re-watching Greys Anatomy as I read this (middle of season 2).
May 21, 2017 at 1:28 pmI also know that this will sound stupid, but I just love how ‘real’ you are in your blog. I actually laugh out loud at some of the things you write. It’s nice to know that someone else out there has such high expectations of themselves and that they don’t always work out perfectly.
Very elegant and beautiful. Thank you for sharing your achievement.
May 21, 2017 at 1:32 pmAnd being detailed
Sorry about the issue you had. But append how to resolve this problem.
Looking beautiful as always.
That was a lot of work and very intricate work. I would never attempt those maneuvers. All the things you did look lovely.
May 21, 2017 at 3:09 pmI enjoy reading about all the activities you do with your family. Still miss you in Grey’s Anatomy. Will see your new films. I have not watched Doubt because I don’t watch television but as soon as the series is released on DVD, I will get it.
Ah yes, the crafter’s volley has hit again 😉 It always takes so much longer than we imagine it will, doesn’t it? Especially when embarking on new but seemingly simple projects.
I think, especially for your very first attempt at this, that you did an awesome job and that everything turned out great. But yes, next year definitely make sure you have time off on Mother’s Day. Goodness knows you deserve it.
May 21, 2017 at 3:38 pmfolly, not volley
May 21, 2017 at 3:41 pmWell…you know, being a mom yourself, that less than perfect gifts are heartwarming from our children. Although I think your gifts are very well done. Just confirms my thoughts that someone who is creative is that way across the board, be it fabric art, painting, acting or whatever. Nice post. Love those ducks!
May 21, 2017 at 5:10 pmThose look beautiful. Don’t be so hard on yourself, our moms don’t expect perfection in what we do like we expect it in ourselves. At least that’s my hope. 🙂 Hope you had a wonderful Mothers Day.
May 21, 2017 at 5:39 pmYou made my day, no not just a day, way more, thank you sooo much☆ I LOVE your writings and what amazing things you do. This made me belly laugh, smile and tears of joy, honest♡
May 21, 2017 at 5:58 pmWow these are gorgeous! I love your post with process photos! You do have fantastic sewing machine! Great ideas and so beautifully made! Greetings from big fan of yours, Finnish quilting and crafting in Greece. x Teje
May 21, 2017 at 6:49 pmWow these look really great. You remind me of me delving into a craft with so much gusto, not knowing what it all really entails. However, you handled it with much more grace than I ever would have. I probably would’ve chucked a plate or two out the window :), probably not even attempt dinner and just gone out, definitely not been able to hand my mother finished embroidered napkins, let alone the plates and coasters hahah. Kudos. The napkins were really beautiful and so so special. Cheers to blindly crafting:)
May 21, 2017 at 7:17 pmWow! The detail, the perseverance! And the outcome was imperfectly perfect. Why are we creatives so hard on ourselves? You achieved amazing things for someone you love. Thanks for sharing the journey and letting us all know you’re just like the rest of us!❤️
May 21, 2017 at 7:36 pmHomemade gifts are the very best gifts. I did pottery for a while and it’s incredibly hard! Whenever I stuffed up (all the time) the teacher would say “it’s okay – it just looks rustic.” 😉
May 21, 2017 at 8:28 pmOh my goodness! Who knew it would be that much work?
May 21, 2017 at 11:08 pmThankfully you finally pulled it off and your mum was appreciative!!
I can not believe how much you do! I’m incredibly jealous that I don’t have the talent or patience to do such things
May 22, 2017 at 4:38 amEverything looks amazing!! Your confidence to jump right in and try these new projects amazes me. I’m too much of a coward to try anything too complicated. Hope you had a fantastic Mother’s Day yourself!
May 22, 2017 at 4:38 pmKatherine, I feel your pain! I have unleashed many days like this on myself over the course of my 30+ years as an adult! I always think I’ve given myself enough time, planning ahead. I’ve learned that I don’t plan far enough ahead! So now that I’m doing event planning on a professional scale, I start planning the moment my event is booked. Even if it’s just a birthday party for someone in my family. Give yourself an A++ for effort! You spent all of that time out of love for your Mother, Grandmother and Aunts. To celebrate them and their lives as women. Those plates and napkins are beautiful and I loved seeing the process you went through. As a professional seamstress myself, I’ve had many, many days of being frustrated at the machine. The best advice I can give you is to get scrap fabric and play with it until you know it well, not just for projects. I’ve been sewing for 41 years and making things for fun were the best ways to learn. Happy Belated Mother’s Day! You’re a great Mama!!
May 22, 2017 at 5:18 pmHahah, it isn’t poop brown! They look great 🙂
May 23, 2017 at 12:56 amAmazing work, love the clay plates and the lace for it. 🙂 Love to try it myself one day.
May 24, 2017 at 1:40 pmBonjour.
June 10, 2017 at 12:34 pmMerci pour votre campagne en faveur de la castration des animaux domestiques .
What is wonderful about the brown plate colors is that even though they don’t work for spring now they can be tucked away for the fall! (though they would here in the White Mountains of NH because we have mud season not spring!)
July 25, 2017 at 3:03 pmWOW!
October 9, 2017 at 2:06 amJust found your site…This post is super inspiring and is begging my creative self to find a ceramic/pottery studio in my area. If for no other reason than to say “Oh these? I made them.” 2018 was learning Knitting and then Crochet & 2019 has found me wanting to learn how to paint &/or spin my own yarn &/or raise my own baby alpaca and sheep to produce the wool with which to spin. However pottery may make the short list. Thanks for sharing – I wish the whole world would experience the feeling of industry of real do-it-yourself creating once again. It would change everything.
January 15, 2019 at 11:05 pm